Monday, February 18, 2013

Flip Flop Repurpose


I have been making this slipper pattern I bought from two girls patterns on Etsy for about 9 months now, lol! I tend to get distracted with the many projects or ideas I have in my head. I usually have to pick up and put down a project many times. Unless a project takes less then 1 hour to complete it can be put down many times in a day, this is especially so, when my little monkey is permanently attached to my hip!

The pattern was great, very detailed instructions and plenty of pictures to help with making the slippers. But, I wanted something more than slippers...I wanted shoes I could wear outside.

I wanted something that was inexpensive, durable and wouldn't look tacky. I finally settled on flip flop bottoms. I bought a few sets of flip flops after the summer which were on clearance for $5.00 at Target. Then I started on my 9 month journey.

Here's what you need to make them:

A slipper pattern
Lecia flip flops or similar type of flip flops
Nail
Hammer
Yarn
Gimp/Yarn
button
shoe glue
scissors
Needle

Here is how to make them:

  •  Crochet your slipper pattern
When I originally made the pattern I crocheted the whole slipper and then added it to the flip flop. I think with this two girls pattern (for all you triers out there) next time it would be easier to make the sole first, attach the sole to the flip flop and then finish the full slipper after. 
  • For your flip flops, cut off your flip flop straps only-leave the three plugs in the bottom (glue the plugs in so they don't fall out). Make sure on the side your foot/slipper will be that there isn't any part of the plugs that would stick your foot (cut off any excess). 
  • Hammer and nail, make holes in the flip flop (around) about 1/2 inch apart and 1/2 inch away from the edge of the shoe. 
  • Gimp/Yarn & needle, thread Gimp or yarn through holes and into the slipper sole. First and last stitch start and end in the slipper for weaving in ends.
I used matching yarn for this part but, my husband suggested gimp to use for climates that have rain and snow a lot. This way you won't have to do a rethread if the yarn breaks as gimp is more durable and waterproof.


I added my own flower pattern to the slipper.
Here is the instructions:

CH-Chain
Sc-Single crochet
Sl St-slip stitch
Dc-Double crochet

Flower 1-
Ch 2. 7 Sc in the second chain from the hook. sl st to join. Add marker pin.
2 Sc in each st around. sl st to join.
5 Dc in the next st, sl st in the next st, repeat 7 times. fasten off and weave in ends (leave 6 inches of string).

Flower 2-

Ch 2. 8 Sc in the second chain from the hook. sl st to join. Add marker pin.
3 Dc in the next st, sl st in the next st, repeat 4 times. fasten off and weave in ends (leave 6 inches of string).


Put the two crochet flower pieces on top of each other after weaving in ends. Sew button in the middle of the two pieces and attach to slipper.

Happy Crafting!
© Hooking Rainbow 02/18/2013. All rights reserved.

Mardi Gras Bead Project 2-Coasters


Tons and tons of beads my friend had from her vacation, so much that there was enough for a few projects. We had so much fun last time making the center pieces and wine glass decorations! Our next project was even more fun and complimented our table theme. Coasters!!!

Here is what you need:

Cardboard/Cardboard box
Scissors
glue gun
Mardi Gra beads
Optional:
Paint/Fabric


Here is what you do:

1.Plug in your glue gun

2.Cut out a few different shape pieces out of  cardboard

3.Cut Mardi Gra bead string to fit you cardboard pieces

4.Use your glue gun to glue the Mardi Gra beads to the cardboard

5. Let your master piece dry


There are a few variations to hide the cardboard (if desired) below:

*You could paint the cardboard (any color).

*You could use scrap fabric to cover the cardboard (any kind)-You would need to glue the fabric to the cardboard.


Happy Crafting! 
© Hooking Rainbow 02/18/2013. All rights reserved.

Friday, February 8, 2013

It's a mystery-Part 4!

Final day of the CAL (crochet-a-long)! The pattern included a row 25 (to even out the bottom) and instructions on how to cut/attach 12 strings each for braids. I had fun with this CAL! So what was the mystery item, you ask?

An adult bonnet!

Part 4 is here

I used a hook size smaller (K instead of an L) and I got a bonnet that fits a toddler!

Here is my finished toddler bonnet:
I added a cute heart button for Valentines day!

If you would like to make this cute bonnet the links to Instructions, Part 1, Part 2 & Part 3 are:

Here

If you would like the full pattern go:

Here

Happy hooking!
© Hooking Rainbow 02/08/2013. All rights reserved.

Thursday, February 7, 2013

It's a mystery-Part 3!

There were a few kinks that needed to be worked out for part 3. Even with testing, things like this can get through! My husband always says the same thing about video games...there maybe some issues that get through testing but, they can be fixed with a patch. That is kinda what happened with the pattern.

Here is the story:

 Row 12 included an abbreviation Spd st that I had never seen before.Which I found out within a few minutes of asking the designer herself. Spd st if you don't know is a spider stitch which is a sc, ch 1, sc into the same stitch. Once I found that out I was off to start part 3 of my mystery item.

However, my brain was against me...It had me thinking one thing and the pattern was saying another thing. I kept wondering why I had more Spd st then the 19 the pattern stated. I think I stared at the pattern for most of the day yesterday until it clicked....I needed to add an additional skip stitch so, 2  in-between the Spd.

Once I got through all that, I got hung up AGAIN on row 24! The pattern originally had a shell st into the chain space of the Spd st. The issue was there was no Spd st to put the shell st in....all issues are now fixed with the pattern though, yay! 

Check out the changes: 

Part 3

Here is my part 3:


I think it is a bonnet, what do you think?

 If you want to participate, here is my link post from yesterday for the CAL:

Instructions, part 1 & part 2


Happy hooking!

© Hooking Rainbow 02/07/2013. All rights reserved.

Wednesday, February 6, 2013

It's a mystery-Part 2!

Yesterday the mystery pattern started to look more like a hat, could it be? What type of hat will it be or will it actually be a hat? There are still two more days of the Crochet-a-long (CAL)so, we will know soon! Here is a  picture of my part 2 progress:


 If you want to participate, here is my link post from yesterday for the CAL:

Instructions and part 1

Part 2 is here

Happy hooking:)
© Hooking Rainbow 02/06/2013. All rights reserved.

Tuesday, February 5, 2013

It's a mystery-Part 1!

I recently came across a post from one of my favorite crochet websites, dearestdebi! She blogged about a mystery crochet along (CAL)! You ask what is a CAL? A CAL is a mystery crochet item in which the pattern is posted in sections. This sounded fun so, I decided to participate:) If you wish to participate to here are the links to start:

Instructions
Part 1 

Here is my part one progress:


What will it be? I will be posting my progress for the next four days of the CAL...Happy hooking!
© Hooking Rainbow 02/05/2013. All rights reserved.

Saturday, February 2, 2013

Mardi Gras Bead Projects


A few days ago a friend came to me and asked: "What do i do with all these Mardi Gra beads I have from my vacation?" She wanted to keep them for memory sake but, didn't want to just stick the bag full in her closet to collect dust. I quickly did some Pinterest searching. There were a few ideas that came up-
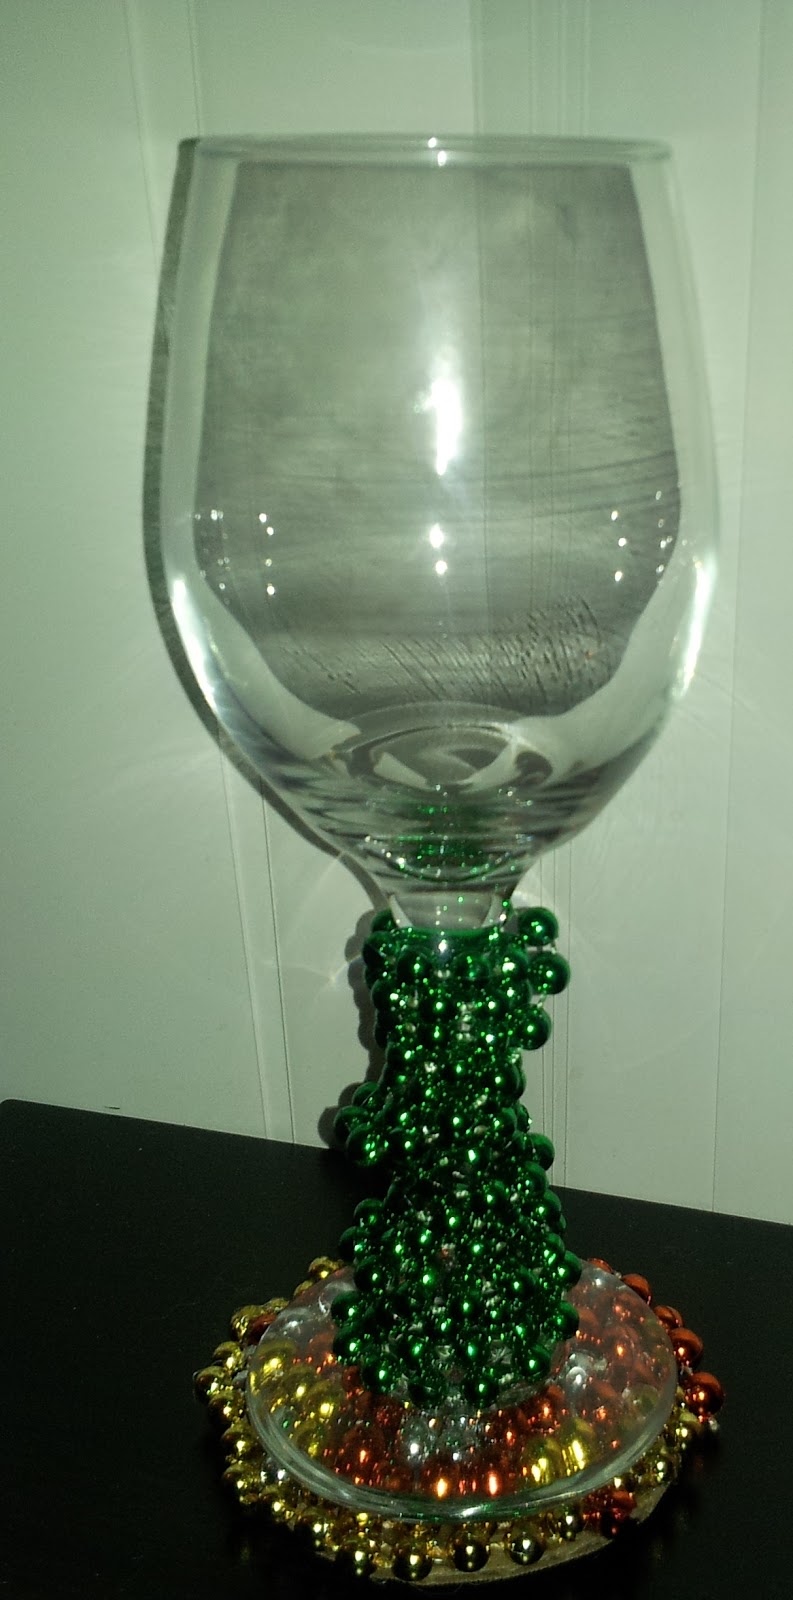
coasters, center pieces, wine glass decorations, mirror ornaments, up-cycling an old lamp....The list can go on. It was decided that we would try center pieces and wine glass decorations due to the fact there is no glue gun involved. Simple and easy...Here what you need to DIY:

Materials:
Vase/Wine glasses
Mardi Gras bead necklaces
Fake flowers-you can use real flowers but, they would need to have a flower water tube/ flower replaced out occasionally.
Scissors: optional

For center pieces:

Pick the color scheme you want...I chose a three scheme pattern.

Example:
Gold, pink and black
or
Purple, blue and green

Add your color bead necklaces into the vase in any order...Do not fill to the top until you add the flowers!

Make sure the flowers are the proper size...Using the scissors cut to the desired length.

Wrap beads around the flowers and add them to the vase.

Now you have a perfect center piece for any occasion. 

For wine glasses:

Take one Mardi Gras bead necklace and one wine glass. Wrap the beads around the wine glass stem. And you're done!

Quick and easy way to liven up your home for guests!

The beads can be taken off the stem for dish washing purposes!

Hope you enjoy the Hooking Rainbows Project! Stay tuned for more fun with beads...There are still plenty left over!
© Hooking Rainbow 02/02/2013. All rights reserved.